Best Garden Tools

Garden Tools

Every gardener needs the best tools available to help them do their job. This article is designed to give you some insight on what items are essential for your garden toolkit—and which ones can be left behind!

As a garden owner, you have certainly seen one or two garden tools and know exactly what you need them for. However, there are also garden tools that are not so well known. Here we present all the common garden tools and explain what is used for what.

(more…)

By October 7, 2021.  No Comments on Best Garden Tools  Garden   

How to Make a Homemade Vermicompost

Worm composter

Living a zero waste lifestyle means you start going to the store with your string bag, buy recyclable food and put it in separate collection bins, but still a lot of food waste remains in the bin.

What is a vermi farm

A home worm farm is a closed unit of several boxes in which compost worms live. Without noise and smell, the worms eat food waste and turn it into fertilizer – biohumus. The same thing happens in nature: compost worms live in the upper layer of the soil, eat fallen leaves, blades of grass and other obsolete parts of plants, turning them into a fertile layer of earth.

Buy or do it yourself

You can choose a worm composter. Yes, there is a demand for them: they buy vermicomposters to get natural fertilizer or earn extra money selling worms (for example, fishermen and followers of organic farming are in demand).

You can assemble the vermicompost yourself from the plastic boxes. The number of boxes depends on the amount of waste – the more food waste you accumulate, the more boxes you need. You can start with two or three boxes, and then increase the number of tiers, for example, to five.

Take several plastic boxes (it is better to take opaque plastic, in nature compost worms live in the dark), one lid for the box, a thin awl or a sharp knitting needle. Make holes in the lid and in all drawers except the last one – they are needed for air exchange. The diameter of the holes should be small – no more than 1-2 mm, otherwise flies can fly into the composter.

The first tier is a container without holes, it is needed to collect excess liquid, insert “working” trays with holes on top and cover with a lid. The composter is ready!

Place in the kitchen, in the hallway, under the table

Place the composter where it is convenient. For example, in the kitchen to immediately send food waste to it, or wherever there is space: in the hallway, on the floor in the dressing room, under the table or in the closet under the sink. During warmer months, the composter can be placed on the balcony.

Note: Compost worms love darkness. If the plastic is not transparent, then the composter can be placed in an open space, if transparent, then in a dark place (in a closet or closet).

Where to get worms

The number (or rather the mass of worms, because no one will count them individually) depends on the volume of food waste. It is best to start with a small number of worms, get comfortable and then expand the population.

For home composting, specially bred Californian worms, domestic “prospectors”, compost worms and so-called fishing worms are suitable.

Where to get compost worms:

  1. Ask a friend of the vermi-farmer.
  2. Dig up: at the dacha in a compost heap or in a litter in a park, garden, forest.
  3. Buy “worms for fishing” in a fishing store. (It is “for fishing”, bloodworms and maggots are not suitable!)
  4. Order from an online Californian or artisan shop.

How to start a vermi farm

First, prepare the base substrate – it is needed to maintain stable conditions in the composter. The substrate retains moisture and provides air exchange. Dry decayed foliage, waste paper and sawdust will do. Torn newspapers, napkins, paper, egg trays and boxes can be used.

Fill the “working” tray with a third of the substrate, moisten from the sprayer. Then place the worms in the tray and add something sweet, like a little fruit peel – the sugary fruit harbors more microorganisms needed to create a comfortable environment. Don’t feed the worms for 2-3 days.

After 2-3 days, start feeding in small portions: do not add new food until the old one has disappeared by at least three quarters. When introducing feed, add a drop of substrate to it: the worms are accustomed to eating only what lies in the ground, and not on the surface. When the working tray is full, leave it to ripen and place the next layer.

The worms calmly experience loneliness: you can load the composter with food and leave for two or three weeks, they will have something to do.

The worms will reproduce until they reach a stable population. In other words, do not be afraid of overpopulation: they themselves regulate the number depending on the amount of feed, area and number of trays.

Worms eat any plant waste.

Tea leaves, coffee grounds, peelings and seeds of vegetables and fruits, food leftovers. Do not put waste from meat and fish – when decomposed, they will attract pests and will smell very bad.

What could go wrong

If the composter is tightly covered with a lid, and an environment is created there (humidity, sufficient air, substrate and feed), then the worms will live comfortably and will not climb onto the walls or cover of the composter.

Molds and parasites (mites, springtails, other types of annelids) can appear in the composter due to excess feed or excess moisture. They get there with the remnants of fruits and vegetables, but they do not harm the worms and the quality of vermicompost and participate in the process of organic decomposition. If you find it unpleasant to deal with them, the tips in the Compost Worms in Your Home group will help.

What to do with biohumus

Vermicompost can be used for feeding indoor plants or as fertilizer in the country. If you have neither flowers nor a summer cottage, you can take the vermicompost to work and feed the plants there or sprinkle it on the lawn near the house – any soil needs fertilization.

Growing Ducks at Home: Tips for Beginners

Growing Ducks at Home

Keeping ducks at home means having a goal of getting early maturing meat or eggs. There are egg, meat-egg and meat breeds of ducks. Below is a description of some of the most popular breeds in private farmsteads.

Peking duck

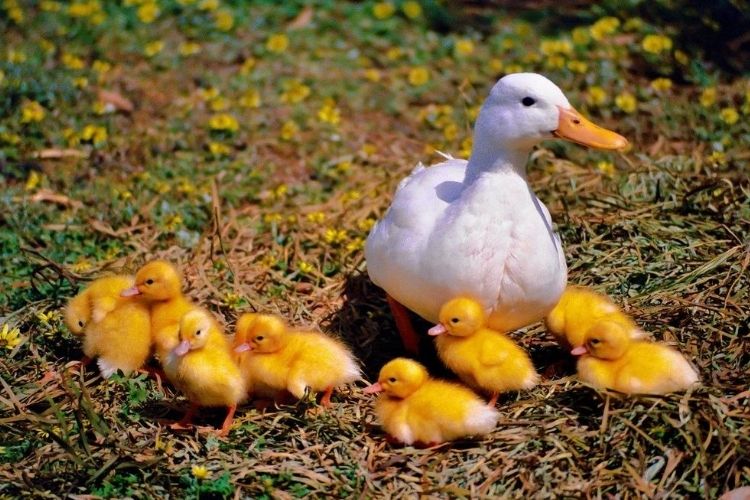
It was bred in China 3 centuries ago. Today, among meat breeds, Peking duck is the most popular. These large white birds with an orange beak and legs are often bred on duck farms and in private households. Therefore, it will not be difficult to acquire young growth.

Adult males weigh about 4 kg, females reach 3-3.4 kg, the average weight of ducklings at the age of 2 months is 2.5 kg. Slaughter yield is 90% of live weight, edible part – 60-65%. During the year, the female brings about 100 eggs weighing 90 g, is able to hatch the offspring on her own, while hatching takes 4 weeks. They are unpretentious in keeping, survive the winter well and rarely get sick. Adult poultry meat is high in fat and slightly harsh. Birds are characterized by increased nervous excitability, so their breeding is accompanied by constant noise.

Muscovy ducks or Indo-duck

They are distinguished by a calm disposition. If something threatens them, then a hiss will be a defensive reaction. For this they are called “mutees”. It’s the very thing to grow them in the country, there will definitely not be any inconvenience. Indo-ducks are good mothers, they are often used to incubate eggs from ducks of other breeds, as well as turkey and chicken. On average, a healthy duck can lay 70-120 eggs per year.This breed is a domesticated species of wild South American ducks and is much inferior in early maturity to Peking. It will take 35-38 days to hatch the chicks, and the young reach a marketable weight of 2.5 kg in 3-3.5 months. An adult male weighs about 4 kg, a duck – 1.5 – 2 kg. However, the meat tastes good and contains a low percentage of fat. Muscovy eggs are a delicacy because they are low in cholesterol.

Mulard

A hybrid obtained by crossing a musky drake and a female mallard. The advantages include early maturity, a low percentage of adipose tissue and cleanliness. Literally, 2 months after hatching, the young are ready for slaughter. Like all interspecific hybrids, mulards cannot reproduce. Of course, they carry eggs, but there is no need to expect offspring from them. On the one hand, sterility is a disadvantage, and on the other, it is a virtue. After all, getting mulard ducklings can be a good business.

Room requirements

Keeping ducks is not difficult, but it is important to follow these rules:

  • the height of the room should not be high, even 1 m is quite enough. On one square meter of area, 5 units of young animals or 3 adults can be placed;
  • be sure to raise the floors 25 cm from ground level in order to avoid precipitation in the house, protect from rodents and keep warm;
  • insulate the room, completely protect the bird from drafts, and in the cold season, the temperature in the room should be maintained at a level not lower than +5 degrees;
  • pay attention to electric lighting. Remember: in winter, domestic ducks stop laying eggs when there is not enough warmth and when there is not enough lighting;
  • on the south or southeast side, equip a hole 40×40 cm in size, install a tightly closing door in the opening;
  • clean the house regularly, so I advise you to take care of your amenities in advance during cleaning;
  • prepare a bedding in the form of hay, straw, sawdust;
  • don’t forget about ventilation, which is necessary to prevent excessive humidity in winter and high temperatures in summer.

Inventory

Feeders are made of boards, everyone can handle this. It is important to make a secure and stable structure with a top bar to prevent birds from trampling and spilling feed.

Equip drinking bowls for each individual. Make sure that the water does not get dirty, otherwise you will have to constantly change it.

Set up nests in the yard where females will lay eggs. A 50x40x50 cm box filled with soft hay is perfect.

If there is a waterfowl on the farm, but there is no reservoir nearby, then make a small pond or pool, not necessarily in the ground, you can use a bath, a trough and other devices.

Maintenance of the parent flock

Anyone who breeds ducks at home is interested in speeding up the breeding process. What is required for this:

  • the length of daylight hours within 16 hours;
  • ambient temperature is not lower than 18 degrees.
  • change the litter regularly, as contaminated eggs lose their hatching qualities;
  • provide the bird with a calm environment, no repair work in the house and near the house;
  • Diversify your diet and be sure to include mineral supplements in your diet. calcium in the form of chalk or broken shell is suitable – all this should be freely available.

Natural incubation

Make nests deep and use a thick layer of bedding. Preparing for the process, the duck does not leave the nest for a long time, with its paws in the litter it arranges a comfortable deep recess and pulls out the fluff for insulation.

Clutch should contain no more than 20 eggs. Caring for ducks during this period is thorough, but insignificant – rest and nutrition are important for them, especially those days when they stop leaving the nests altogether.

Artificial incubation

Breeding ducklings in an incubator is costly and troublesome. It is important to observe the special temperature and humidity level. If you also use budget models of the incubator, then you may have to turn the eggs 3 times a day by hand. And for culling, carried out on the 8th and 25th day, an ovoscope is required.

Assessment of offspring

To further successfully breed the bird, it is necessary to select healthy viable offspring. The selection is carried out according to the criteria:

  • uniform color of down;
  • wings pressed to the body;
  • soft abdomen and no bleeding from the umbilical cord;
  • shiny and prominent eyes.

Feeding little ducklings

From the first days, ducklings are fed with wet food – a slightly cooked mash of cereals, or starter food for young animals.

Alternately, you can give undercooked corn grits, chaff, millet … Wet bran and boiled eggs will not be superfluous – all this is finely crumbled. A week later, greens and peas soaked and twisted in a meat grinder are added to the diet (an excellent vegetable protein, thanks to which the young grows quickly).

If the third week has gone from the moment of birth, then yeast, ordinary fresh raw yeast for baking, can be safely introduced into the diet. The daily rate is not more than 3%. Fact: A bird that gets the yeast doesn’t fall to its feet!

From the third week, vegetables should also appear in the diet, chop them into small slices or grate them. It would be great to give the ducklings young nettles and zucchini. Chop the zucchini on a coarse grater and mix with a chop.

The daily rate is something like this:

  • grain 45%
  • food additives 25%
  • greens and vegetables 20%
  • protein food 15%

Prevention and treatment of diseases

From the age of one week, antibiotics need to be added to the water, enough twice with a break a week. You can use grisin, a wide spectrum of action.

Add fish oil to your food daily. It is worth stopping a month before the bird goes to meat in order to get rid of the smell.

When the bird reaches 3 kg, then it’s time to clean it up for meat, it makes no sense to keep them longer, it is not profitable! If the duck is sick, as a rule, it occurs due to unsanitary conditions, then it will be correct to give the duck to drink antibiotics. But again, pricking should be stopped a month before slaughter.

Important! When starting a duck business, try to manage a large number of birds, as keeping birds in small batches is not beneficial.


Asparagus Growing

growing asparagus

How to grow asparagus in the garden. How to keep the harvest

Asparagus is one of the most delicious, healthy and expensive vegetable crops. Asparagus is also one of the earliest vegetables of the new season: along with rhubarb, we start harvesting young asparagus shoots in April.

Asparagus (Asparagus officinalis) belongs to the asparagus family (previously it was referred to the lily family, but later the classification was changed). Asparagus grows throughout Europe, western Asia and northern Africa. Asparagus has been known to people since ancient times. Previously, asparagus was cultivated for medicinal purposes, as a diuretic and blood purifier. During the Renaissance, asparagus was declared an aphrodisiac and therefore banned from the use of monks (a fact that makes modern people smile).

Young tender asparagus shoots that have just emerged from the ground are used for food. As soon as the leaf buds on the shoot begin to bloom, the shoot becomes denser, tough and unsuitable for eating. In addition to outstanding useful and gastronomic properties, asparagus is an ornamental crop, which is used in floral arrangements (many are familiar with the delicate “Christmas trees” with orange berries in flower bouquets).

Asparagus is a perennial dioecious plant that can be easily grown in the garden, but it takes a lot of space to successfully cultivate it. Plants that have reached their peak fruiting yield about 9-12 shoots per season (enough to make just 2 servings of vegetable side dish!). Such a modest yield and a short shelf life, when large areas are required and manual harvesting, explains the high cost of asparagus compared to other vegetables.

Modern asparagus varieties are mostly male open-pollinated first-generation hybrids – they are more productive, do not produce seeds and do not self-seeding. The shoots of the male asparagus plants are thicker and stronger and the female ones are thinner, although the female plants produce more of them. When choosing asparagus varieties for a private garden, give preference to high-yielding, frost-resistant and disease-resistant modern hybrids: Jersey Giant, Jersey Knight, Jersey Prince, Syn 53, Syn 4-362, UC 157, Viking KBC. If you want to see berries at the end of summer on a female asparagus plant, then plant at least one next to the male ones, and … get ready to fight massive self-seeding.

Growing asparagus

For planting asparagus, choose a calm and sunny spot somewhere at the back of your garden. Asparagus can live in the garden for up to 20-25 years without the need for transplants. Prepare pits measuring 30 by 30 cm, which should be filled with a mixture of rotted manure, garden compost, and soil.

You can sow asparagus with seeds in early spring, but you can get a faster harvest from a young plant or the root of a plant purchased from a garden center. Plants are planted at a distance of 40-45 cm from each other. Caring for asparagus is quite simple: manual weeding, fertilizing plants before (early spring) and after fruiting with well-rotted manure or mineral fertilizers, as well as autumn mulching with a thick layer of natural materials (leaf humus, wood chips, crushed bark, etc.). Before mulching, the yellowed asparagus is cut to the root.

You can harvest the first crop of shoots from asparagus that has reached 3 years old. Shoots are cut, 15-20 cm long from the ground, within 4-6 weeks from the beginning of fruiting. Asparagus can be harvested from older plants within 8-10 weeks. For harvesting, use a special asparagus knife that can easily cut offshoots 2 cm below the ground, or simply break them off with your hands near the ground.

Storing and preserving asparagus

The harvested asparagus is best consumed immediately, as storage degrades the nutritional quality of the vegetable. To preserve the asparagus crop for several days, treat the shoots as if they were fresh flowers: refresh the cuts and place them in a glass of water. The water should cover the base of the shoots by a couple of centimeters. Cover the glass with plastic wrap and store in the lower compartment of the refrigerator.

Canned asparagus loses significantly in nutritional value, appearance, and most importantly – in its amazing taste. The most gentle method of preserving asparagus is quick freezing. Pour boiling water over washed shoots with fresh cuts for 3 minutes, then discard the asparagus in a colander and pour over with cold water to stop the cooking process. Drain the water, wrap the shoots in freezer bags and remove the air from them. Sign the asparagus bags and place in the freezer.


By July 31, 2020.  No Comments on Asparagus Growing  Garden   

Where To Start Ostrich Breeding?

ostrich farm

What should a person do if he has the opportunity to engage in agriculture or farming, but his soul does not lie in growing potatoes and raising chickens? I would like to try something interesting and exotic, but scary, what if it doesn’t work out? There is one idea that can bring pleasure and quick profit. This is ostrich breeding. Lovely “babies” can become a real gold mine for those who correctly draw up a work plan and assess their capabilities.

Why ostriches?

Raising ostriches is an interesting and unusual activity. This huge bird is the source of many valuable foods. Even the fact that when raising other poultry is not considered as a commodity at all is in demand. The budding farmer will have to network and network across a variety of industries. And he will have something to interest buyers, because very soon the sales plans will include:

  • Diet and healthy ostrich meat. Low-fat and rich in protein composition, a product that restaurants and shops are happy to buy. Each bird – at least 25 kg of meat when cutting. And the price of this product is much higher than that of beef or chicken.
  • Ostrich fat. Pharmaceutical and cosmetic companies buy this product with pleasure for the production of ointments, creams or other products. You can get 10-15 kg of fat from each bird.
  • Eggs that are striking in size and delicate taste. They have a surprisingly long shelf life (up to a year), and are used not only for food, but also as a material for artistic painting, cutting and engraving.
  • A feather that can be used as pillow material or sold to fashion houses and dance groups to decorate hats and costumes. It will also be possible to earn income by selling male feathers as souvenirs.
  • The skin from which bags, wallets and other haberdashery goods are made. It will be in demand because it has high elasticity, moisture resistance and a long service life.
  • Breeding bird. This is also a kind of commodity, as home breeding of ostriches is gaining momentum.
  • Claws and droppings are also a commodity! Claws can be sold to button and fastener makers, and droppings can be sold as a valuable soil fertilizer.

As you can see, breeding ostriches can be very profitable. If profitability is the first item in your plans, then this business is for you.

How to build a business?

Any business starts with a well-written work plan. In economics, this is called writing a business plan. It should be clear and feasible, you should not set sky-high goals, first you need to prepare the basis for them. Breeding ostriches as a business is subject to careful preparation. A typical business plan consists of the following points:

  • plans for the volume of production and sale of the final product;
  • plans for the cost of purchasing feed, electricity and heat;
  • marketing (price justification, promotions, customer acquisition);
  • organizational issues (information about buyers and suppliers, personnel selection, search for partners);
  • objective risk assessment;
  • financial plans (search for sources of financing, profitability, planning of repayment of loan money);
  • the final part (determining the ultimate goals of drawing up a business plan, summary information).

Since at the initial stage of building a business, large financial costs are required, the farmer must understand that his risks are very high. There is always a chance of incidents that he cannot influence. It can be natural disasters, unexpected epidemics, death of birds. In this case, the farmer will go bankrupt even with the most scrupulous implementation of business plans. In all other cases, raising ostriches at home can become a stable source of income.

First steps

To set up an ostrich farm, you need to rent a large plot of land. There are some nuances here. Not every area is suitable for keeping ostriches. It must be protected from the wind and well lit. You cannot choose cheaper wetland or damp lands.

The farmer must complete all the necessary documents and permits. Then hire staff, not forgetting that they are not only handymen, but also a livestock technician, watchman, veterinarian. This is followed by the purchase of feed and equipment. It is advisable not to skimp on the quality and equipment of incubators. Immediately select a model with temperature measurement, moisture detection and automatic egg turning.

When the site and equipment are ready, birds can be purchased. Usually they buy several heads of monthly chickens, as well as females and males at reproductive age.

Content methods

The first step is to decide how to raise ostriches. You must choose one of three ways:

  • Intensive keeping of ostriches. The birds will be kept in a small area in close contact with the staff.
    Extensive housing, that is, a large territory is equipped for the birds, where they are left to themselves most of the time.
  • Semi-intensive keeping of ostriches, in which close contacts with birds are established in large areas.
  • You should also know that it is possible to breed livestock according to a single-level scheme, purchasing and raising chicks of the same age before slaughter. And according to a multilevel scheme, when individuals of different ages are raised in the same territory.

Breed selection

Most often, farmers prefer the breeding of African ostriches. These are large, unpretentious birds, weighing more than 160 kg. They are not afraid of high and low temperatures, and are unpretentious in food.

Australian emus can be bred. In this case, you will have to build separate enclosures for couples. Poultry is mainly slaughtered for meat. The weight of an adult is up to 75 kg.

The third ostrich species is the South American rhea. These ostriches are smaller in size than African ones. They live in small herds and love water very much.

Organization of feeding

Correct selection of drinking bowls and feeders plays an important role in the organization of feeding. Ostriches eat greedily and a lot. Therefore, to avoid injury, several large feeders must be installed. The sizes are calculated as follows: each chick has at least 50 cm of space, and for an adult ostrich – 1.5 m. The design of the feeder should be stable and comfortable. Placement height – to match the height of the birds.

The best way to feed ostrich hay and branches is from a trellised nursery. Their height is approximately 70 cm from the ground (floor) level. It is good to use strong plastic containers or ordinary troughs as a drinker.

Selection of feed

To grow a strong and well-nourished bird, you need to properly organize the selection of feed. Food should be varied and nutritious.

The ostrich diet consists of:

  • mineral additives, which are used as gravel, phosphates, shell rock, calcium and fluorine;
  • roughage, i.e. hay and straw;
  • fresh fruits and vegetables, melons, pumpkins, apples, cucumbers, radishes or potatoes;
  • green grass, best of all alfalfa, nettle, clover or quinoa;
  • silo;
  • fish and bone meal;
  • grains and seeds of various crops;
  • vitamins.

Despite the extensive list of foods, feeding ostriches is quite simple. They are not picky and voracious. The main thing is to observe the necessary proportions of feed for chicks in order to get a healthy adult livestock.

Chickens are prepared special mixtures of crushed clover leaves (alfalfa) and compound feed with 20% protein content.

As a protein supplement, ostriches should be fed with boiled eggs and cottage cheese. From four weeks to three months, chicks should have no more than 12% fiber in the feed. Separately, they are offered small stones for grinding coarse forage grasses and greens.

Maintaining health

The main diseases of ostriches are associated with indigestion and respiratory infections. To prevent mass diseases on an ostrich farm, you must strictly adhere to the following standards:

  • cleaning of premises and territories should be daily;
  • special quarantine pens are being set up on the farm for sick or only acquired birds;
  • rooms and equipment, including feeders and water tanks, should be regularly disinfected;
  • workers, especially those involved in incubators and young animals, must observe a disinfection regime and use gloves; be sure to conduct regular analyzes of droppings for infectious diseases and parasites;
  • measures for the destruction of rodents must be carried out on time, and in compliance with safety measures;
  • be sure to follow the bird vaccination schedule;
  • the water in the drinkers should be in sufficient quantity and be replaced with fresh water daily;
  • the farm is necessarily equipped with disintegrating barriers.

Thus, diseases of ostriches are limited to isolated cases. And the livestock on the farm is kept healthy and reproductive.

Armed with the necessary knowledge and documentation, you can start setting up an ostrich farm.

The days when your business will cease to be considered exotic and ostrich meat dishes will take their rightful place on our tables are not far away.